This guide shows a simple way to create a Hugo website and publish it with GitHub Pages. The workflow is:
- Write the site posts in markdown.
- Store the source code in GitHub.
- Let GitHub Actions build the site.
- Let GitHub Pages publish the generated files.
This setup works well for a personal blog, portfolio, project page, or documentation site.
1. Create A Hugo Site
Create the project:
| |
Add a theme. This example uses PaperMod as a Git submodule:
| |
Configure the site in hugo.toml:
| |
Replace https://example.com/ with your real domain when you have one.
If you do not have a custom domain yet, you can still deploy using the default GitHub Pages URL https://<your-github-username>.github.io/
Create a .gitignore file to avoid uploading generated Hugo files:
| |
2. Push The Initial Site To GitHub
Create a repository on GitHub, then connect your local project:
| |
If your theme is a submodule, make sure .gitmodules is committed. The deployment workflow needs it to fetch the theme.
3. Use Branches For Changes (optional)
Use main as the deployment branch. For writing, editing, or changing the deployment configuration, create a separate branch.
This guide uses update-website as the working branch name. If you prefer another name, replace update-website in the commands.
| |
Make your changes, preview locally, then commit:
| |
Once you want to publish something, open a pull request from update-website into main. When the pull request is merged, GitHub Actions will build and deploy the site.
4. Create And Preview Posts
Create a new post:
| |
Open the file and set draft to false when you want it published:
| |
Preview the site locally:
| |
Then open the local URL printed by Hugo, usually:
| |
If you want to preview drafts too, run:
| |
Once you have finished editing your post, upload your branch to GitHub:
| |
In GitHub, create a pull request from update-website to main. Merge it when you are ready to publish.
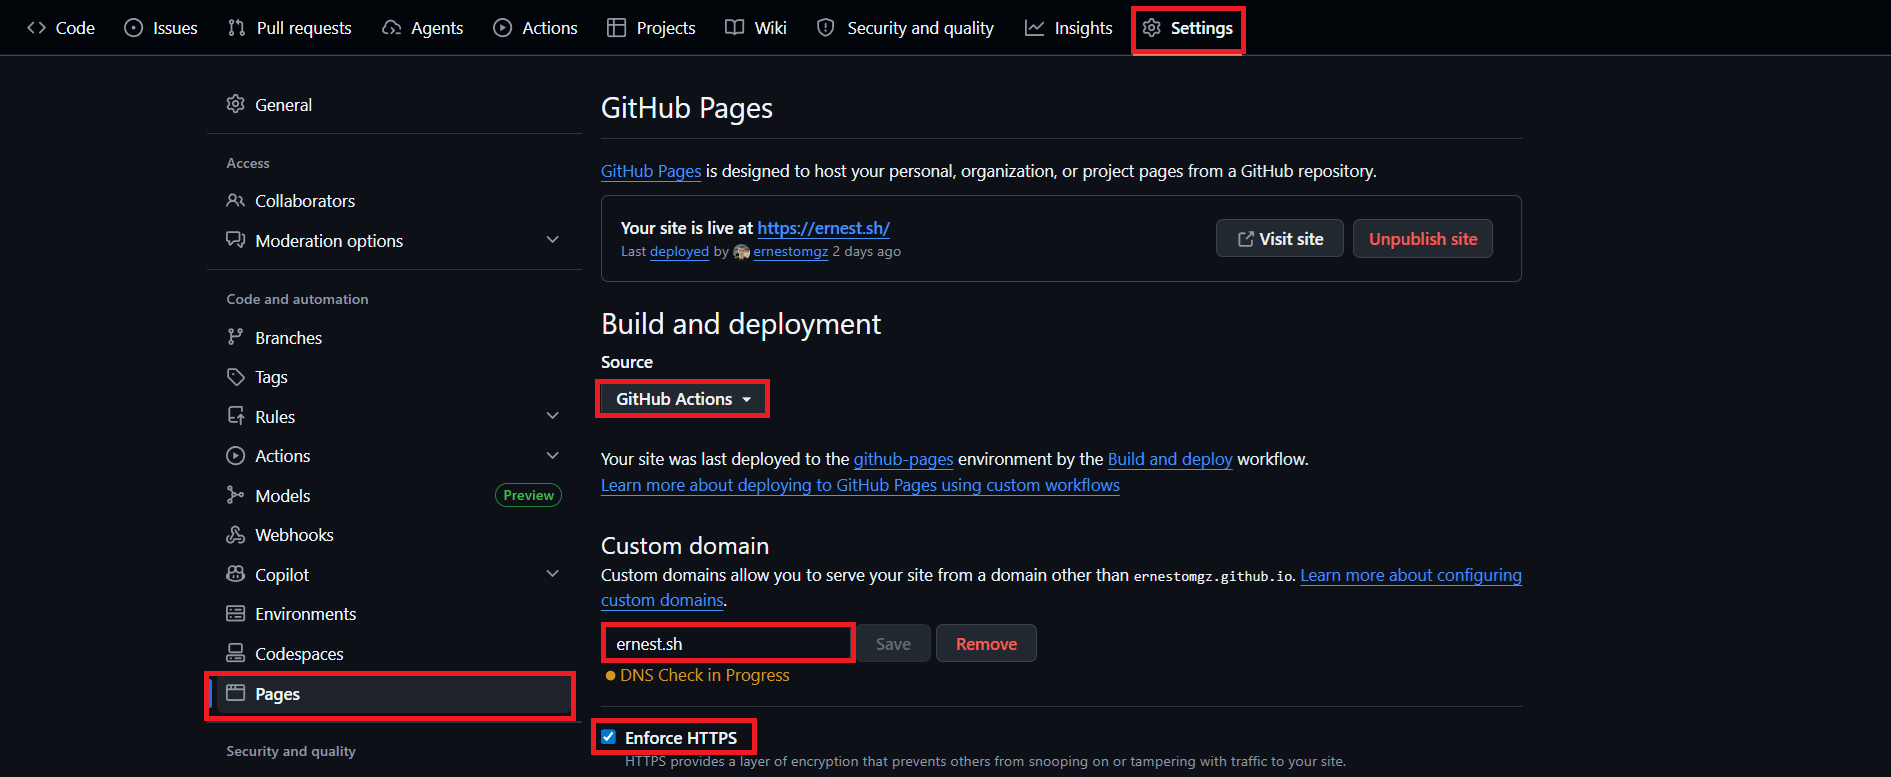
5. Configure GitHub Pages And Actions
In the GitHub repository, go to:
| |
Under Build and deployment, set:
| |
This tells GitHub Pages to publish the artifact produced by your workflow.
If you have a custom domain, add it in the repository’s GitHub Pages Custom domain settings and enable HTTPS. If you do not have one leave the form empty.
Also, create the file static/CNAME with the following content:
| |
Create the workflow file:
| |
Use a workflow like this, based on Hugo’s official GitHub Pages guide and GitHub’s Pages workflow documentation:
| |
This version is intentionally simple. If your theme needs Sass, npm packages, Go modules, or image processing, start from Hugo’s official workflow because it includes extra setup and caching.
6. Deploy The Site
Commit and push the workflow:
| |
In GitHub, create a pull request from update-website to main. The site deploys when the pull request is merged into main.
Open:
| |
Watch the workflow run. If it succeeds, GitHub Pages publishes the site.
Example:

7. Configure DNS
You can skip this step if you want to use the default GitHub Pages URL.
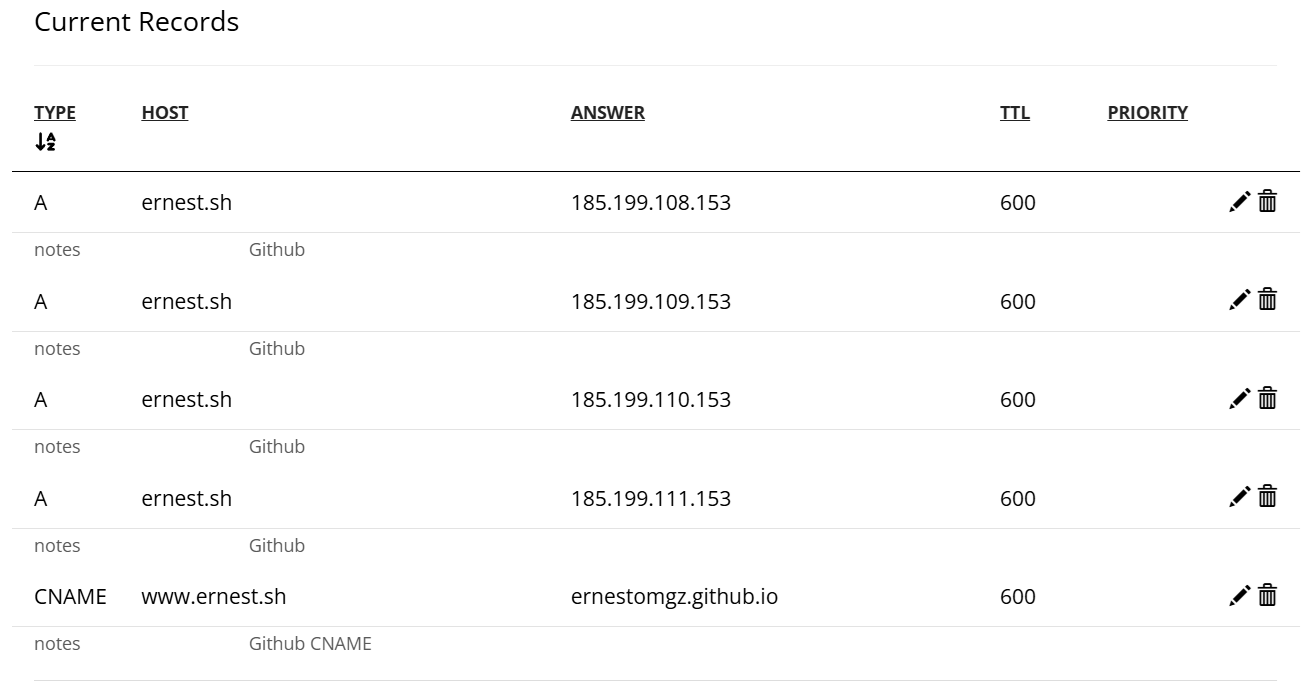
If you have your own custom domain, at this step you have to go to your DNS provider, such as Cloudflare, Porkbun, or Namecheap, to point the domain to GitHub Pages.
At your DNS provider, configure the apex/root domain with GitHub Pages’ A records:
| Type | Host | Value |
|---|---|---|
| A | @ | 185.199.108.153 |
| A | @ | 185.199.109.153 |
| A | @ | 185.199.110.153 |
| A | @ | 185.199.111.153 |
Optional IPv6 records:
| Type | Host | Value |
|---|---|---|
| AAAA | @ | 2606:50c0:8000::153 |
| AAAA | @ | 2606:50c0:8001::153 |
| AAAA | @ | 2606:50c0:8002::153 |
| AAAA | @ | 2606:50c0:8003::153 |
If you want to also configure the subdomain for www.<your-domain>, add a CNAME record:
| Type | Host | Value |
|---|---|---|
| CNAME | www | <your-github-username>.github.io |
For example, ernest.sh is hosted in Porkbun and this is the DNS config I use:
Final Notes
I recommend using a separate branch for drafts and edits, preview locally with hugo server, and merge to main only when you are ready to publish.
You can use Hugo’s in-memory rendering and a temporary cache directory to preview locally. This helps manage files in your repository.
| |
After that, publishing is simple: write Markdown, commit, merge, and GitHub Pages serves the updated site automatically.
Treat every committed file as public. Do not commit:
.envfiles.- API keys.
- Passwords.
- Cloud provider publish profiles.
- Private certificates.
- Client data.
- Internal infrastructure notes.
- Drafts with sensitive information.